


1. 前言
InfoNES 是一款经典的任天堂娱乐系统(NES)模拟器,旨在让用户在现代计算机上重温80年代和90年代初期的经典 NES 游戏。该模拟器提供了高度准确的 NES 硬件仿真,支持大多数 NES 游戏,并提供了一种真实的游戏体验。InfoNES 具有用户友好的界面和简单的操作,使得用户可以轻松加载并玩经典的 NES 游戏。无论是想要怀旧,还是想要尝试一些传统的游戏,InfoNES 都为用户提供了一个便捷的平台,让他们沉浸在这些标志性的8位游戏中,体验游戏历史的魅力。
2. 下载
下载启动器源码:https://github.com/nejidev/arm-NES-linux
3. 解压
sudo unzip arm-NES-linux-master.zip
4. 配置源码
源码的编译是在编译完成的 buildroot 文件系统下完成的,必须使能 alsa-lib 和 alsa-utils 才可以使用
1、新建一个work文件夹
mkdir /linux/work
2、进入到源码中的 linux 目录下
cd arm-NES-linux-master/linux
3、修改Makefile文件:vim Makefile
CC = /home/linux/buildroot-2023.11/output/host/bin/arm-linux-gnueabihf-gcc
TARBALL = InfoNES08J

# InfoNES
.CFILES =	./../K6502.cpp \
		./../InfoNES.cpp \
		./../InfoNES_Mapper.cpp \
		./../InfoNES_pAPU.cpp \
		./InfoNES_System_Linux.cpp joypad_input.cpp

.OFILES	=	$(.CFILES:.cpp=.o)

CCFLAGS =  -O2 -fsigned-char -I/home/linux/buildroot-2023.11/output/staging/usr/include
LDFILGS = -lstdc++ -L/home/linux/buildroot-2023.11/output/staging/usr/lib       # gcc3.x.x

all: InfoNES

InfoNES: $(.OFILES)
	$(CC) $(INCLUDES) -o $@ $(.OFILES) $(LDFILGS) -lm -lpthread -lasound

.cpp.o:
	$(CC) $(INCLUDES) -c $(CCFLAGS) $*.cpp  -o $@

clean:
	rm -f $(.OFILES) ../*~ ../*/*~ core

cleanall:
	rm -f $(.OFILES) ../*~ ../*/*~ core InfoNES

release: clean all

tar:
	( cd ..; \
	tar cvf $(TARBALL).tar ./*; \
	gzip $(TARBALL).tar \
	)

install:
	install ./InfoNES /linux/work
在 CCFLAGS 后面增加 alsa 的头文件目录(该目录在bulidroot/output那里例如)
-I/home/linux/buildroot-2023.11/output/staging/usr/include
在 LDFILGS 增加 alsa 的 lib 文件目录(和上面一样)
-L/home/linux/buildroot-2023.11/output/staging/usr/lib
修改最上面的 CC 为 bulidroot 里面的 gcc
/home/linux/buildroot-2023.11/output/host/bin/arm-linux-gnueabihf-gcc
4、更改最后的 install 那里为前面建立的 work 目录
install ./InfoNES /linux/work
5、修改 linux/InfoNES_System_Linux.cpp 文件中的 static int lcd_fb_display_px 函数(调整 spi 屏幕的颜色):
static int lcd_fb_display_px(WORD color, int x, int y)
{
    unsigned char  *pen8;
    unsigned short *pen16;
    pen8 = (unsigned char *)(fb_mem + y*line_width + x*px_width);
    pen16 = (unsigned short *)pen8;
    *pen16 = color;

    return 0;
}
修改为:
static int lcd_fb_display_px(WORD color, int x, int y)
{
    unsigned char  *pen8;
    unsigned short *pen16;

    unsigned char r, g, b;
    r = ((color >> 10) & 0x1f);
    g = ((color >> 5) & 0x3f);
    b = (color & 0x1f);

    color = r<<11|g<<6|b;
    pen8 = (unsigned char *)(fb_mem + y*line_width + x*px_width);
    pen16 = (unsigned short *)pen8;
    *pen16 = color;

    return 0;
}
如果不改的话:
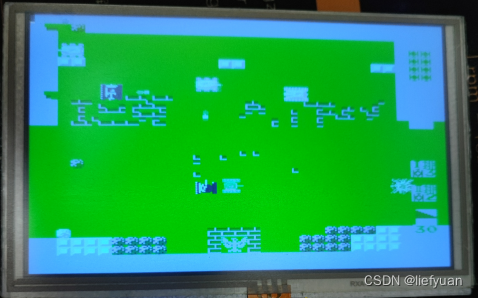
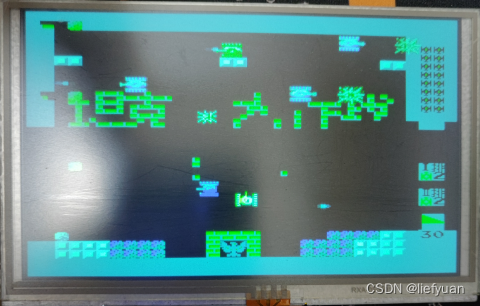
改了颜色就好一些:
6、声音实现
实现这个声音支持的前提是,板子上得有基于alsa框架的音频驱动且功能正常。否则以下这些实现里需要全部留空,不用实现。驱动不正常还没有留空运行游戏会直接卡死。
/*===================================================================*/
/*                                                                   */
/*        InfoNES_SoundInit() : Sound Emulation Initialize           */
/*                                                                   */
/*===================================================================*/
void InfoNES_SoundInit( void )
{

}

/*===================================================================*/
/*                                                                   */
/*        InfoNES_SoundOpen() : Sound Open                           */
/*                                                                   */
/*===================================================================*/
int InfoNES_SoundOpen( int samples_per_sync, int sample_rate )
{
	// sample_rate 采样率 44100
	// samples_per_sync  735
	// 采样率 / 8 * 声道数 = 44100 / 8 * 1 = 5512.5
	// 8位 声音
	/*
	声道数 1
    采样率 44100
    采样位数 8
    每次播放块大小(NES  APU 每次生成一块)735
	*/
	unsigned int rate      = sample_rate;
	snd_pcm_hw_params_t *hw_params;

	if(0 > snd_pcm_open(&playback_handle, "default", SND_PCM_STREAM_PLAYBACK, 0))
	{
		printf("snd_pcm_open err\n");
		return -1;
	}
	printf("snd_pcm_open ok!\nsamples_per_sync=%d,sample_rate=%d\n",samples_per_sync,sample_rate);

	if(0 > snd_pcm_hw_params_malloc(&hw_params))
	{
		printf("snd_pcm_hw_params_malloc err\n");
		return -1;
	}

	if(0 > snd_pcm_hw_params_any(playback_handle, hw_params))
	{
		printf("snd_pcm_hw_params_any err\n");
		return -1;
	}
	if(0 > snd_pcm_hw_params_set_access(playback_handle, hw_params, SND_PCM_ACCESS_RW_INTERLEAVED))
	{
		printf("snd_pcm_hw_params_any err\n");
		return -1;
	}

	//16bit PCM 数据

	if(0 > snd_pcm_hw_params_set_format(playback_handle, hw_params, SND_PCM_FORMAT_U8))
	{
		printf("snd_pcm_hw_params_set_format err\n");
		return -1;
	}

	if(0 > snd_pcm_hw_params_set_rate_near(playback_handle, hw_params, &rate, 0))
	{
		printf("snd_pcm_hw_params_set_rate_near err\n");
		return -1;
	}

	//单声道 非立体声
	if(0 > snd_pcm_hw_params_set_channels(playback_handle, hw_params, 1))
	{
		printf("snd_pcm_hw_params_set_channels err\n");
		return -1;
	}

	if(0 > snd_pcm_hw_params(playback_handle, hw_params))
	{
		printf("snd_pcm_hw_params err\n");
		return -1;
	}

	snd_pcm_hw_params_free(hw_params);

	if(0 > snd_pcm_prepare(playback_handle))
	{
		printf("snd_pcm_prepare err\n");
		return -1;
	}

	return 1;
}

/*===================================================================*/
/*                                                                   */
/*        InfoNES_SoundClose() : Sound Close                         */
/*                                                                   */
/*===================================================================*/
void InfoNES_SoundClose( void )
{
	snd_pcm_close(playback_handle);
}

/*===================================================================*/
/*                                                                   */
/*            InfoNES_SoundOutput() : Sound Output 5 Waves           */
/*                                                                   */
/*===================================================================*/
void InfoNES_SoundOutput( int samples, BYTE *wave1, BYTE *wave2, BYTE *wave3, BYTE *wave4, BYTE *wave5 )
{

	int i;
	int ret;
	unsigned char wav;
	unsigned char *pcmBuf = (unsigned char *)malloc(samples);

	//printf("InfoNES_SoundOutput,samples=%d\n",samples);
	//printf("\n");
	for (i=0; i <samples; i++)
	{
		wav = (wave1[i] + wave2[i] + wave3[i] + wave4[i] + wave5[i]) / 5;
		//单声道 8位数据
		pcmBuf[i] = wav;
		//printf("%02x",wav);
	}
	//printf("\n");
	ret = snd_pcm_writei(playback_handle, pcmBuf, samples);
	if(-EPIPE == ret)
    {
        snd_pcm_prepare(playback_handle);
    }
	free(pcmBuf);
	return ;
}
5. 编译
make clean
make
make install
生成的文件在 work 文件夹下:
InfoNES
然后把这个 InfoNES 拷贝到开板上就可以了。
6. 运行
打开游戏
./InfoNES hdl-chinese.nes
跑起来了!!
6、添加USB手柄支持
linux kernel 里面编译:
linux menuconfig
     > Device Drivers > Input device support
     	<*>   Joystick interface
      	[x]   Joysticks/Gamepads  --->
     > Device Drivers > HID support > Special HID drivers
      	<*> DragonRise Inc. game controller
重新烧录内核后,插上游戏手柄:/dev/input 下出现了 js0 设备节点
# ls /dev/input
event0 event1 js0
设备节点出来了,但是游戏手柄按键按着没有反应!
写一个用户空间代码测试一下手柄键值:
#include
#include
#include

typedef unsigned int __u32;
typedef short __s16;
typedef unsigned char __u8;

struct js_event {
    __u32 time;     /* event timestamp in milliseconds */
    __s16 value;    /* value */
    __u8 type;      /* event type */
    __u8 number;    /* axis/button number */
};

#define JS_EVENT_BUTTON         0x01    /* button pressed/released */
#define JS_EVENT_AXIS           0x02    /* joystick moved */
#define JS_EVENT_INIT           0x80    /* initial state of device */

int main() {
    int fd = open("/dev/input/js0", O_RDONLY);
    struct js_event e;
    while(1) {
        read(fd, &e, sizeof(e));
        int type = JS_EVENT_BUTTON | JS_EVENT_INIT;
        switch(e.type) {
            case JS_EVENT_AXIS:
                printf("axis number: %d, value: %d, time: %d\n", e.number, e.value, e.time);
                break;
            case JS_EVENT_BUTTON:
                printf("btn: number: %d, value: %d, time: %d\n", e.number, e.value, e.time);
                break;
        }
    }
    close(fd);
    return 0;
}
编译:
arm-linux-gnueabihf-gcc test.c -o joytest
拷贝到开发板上:
sudo cp joytest /media/liefyuan/rootfs/opt/
测试:
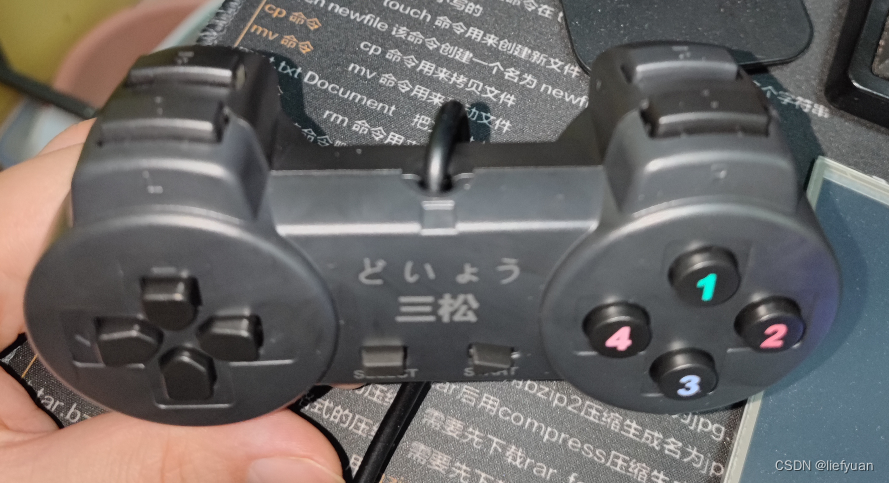
| 游戏手柄按键 | 读出的键值 |
|---|---|
| L1 | btn: number: 4, value: 1, time: 198640 |
| btn: number: 4, value: 0, time: 198850 | |
| L2 | btn: number: 6, value: 1, time: 221840 |
| btn: number: 6, value: 0, time: 222000 | |
| R1 | btn: number: 5, value: 1, time: 255670 |
| btn: number: 5, value: 0, time: 255840 | |
| R2 | btn: number: 7, value: 1, time: 257390 |
| btn: number: 7, value: 0, time: 257470 | |
| 左方向键上 | axis number: 1, value: -32767, time: 51680 |
| axis number: 1, value: 0, time: 51840 | |
| 左方向键下 | axis number: 1, value: 32767, time: 99770 |
| axis number: 1, value: 0, time: 99900 | |
| 左方向键左 | axis number: 0, value: -32767, time: 132060 |
| axis number: 0, value: 0, time: 132150 | |
| 左方向键右 | axis number: 0, value: 32767, time: 156420 |
| axis number: 0, value: 0, time: 156510 | |
| SELECT键 | btn: number: 8, value: 1, time: 312440 |
| btn: number: 8, value: 0, time: 312600 | |
| START键 | btn: number: 9, value: 1, time: 313560 |
| btn: number: 9, value: 0, time: 313730 | |
| 右边数字键1 | btn: number: 0, value: 1, time: 460600 |
| btn: number: 0, value: 0, time: 460770 | |
| 右边数字键2 | btn: number: 1, value: 1, time: 461560 |
| btn: number: 1, value: 0, time: 461730 | |
| 右边数字键3 | btn: number: 2, value: 1, time: 463040 |
| btn: number: 2, value: 0, time: 463200 | |
| 右边数字键4 | btn: number: 3, value: 1, time: 463790 |
| btn: number: 3, value: 0, time: 463920 |
查看一下它的写法:
/linux/joypad_input.cpp
...
static int USBjoypadGet(void)
{
	/**
	 * FC手柄 bit 键位对应关系 真实手柄中有一个定时器,处理 连A  连B
	 * 0  1   2       3       4    5      6     7
	 * A  B   Select  Start  Up   Down   Left  Right
	 */
	//因为 USB 手柄每次只能读到一位键值 所以要有静态变量保存上一次的值
	static unsigned char joypad = 0;
	struct js_event e;
	if(0 < read (USBjoypad_fd, &e, sizeof(e)))
	{
		if(0x2 == e.type)
		{
			/*
			上:
			value:0x8001 type:0x2 number:0x5
			value:0x0 type:0x2 number:0x5
			*/
			if(0x8001 == e.value && 0x5 == e.number)
			{
				joypad |= 1<<4;
			}

			/*下:
			value:0x7fff type:0x2 number:0x5
			value:0x0 type:0x2 number:0x5
			*/
			if(0x7fff == e.value && 0x5 == e.number)
			{
				joypad |= 1<<5;
			}
			//松开
			if(0x0 == e.value && 0x5 == e.number)
			{
				joypad &= ~(1<<4 | 1<<5);
			}

			/*左:
			value:0x8001 type:0x2 number:0x4
			value:0x0 type:0x2 number:0x4
			*/
			if(0x8001 == e.value && 0x4 == e.number)
			{
				joypad |= 1<<6;
			}

			/*右:
			value:0x7fff type:0x2 number:0x4
			value:0x0 type:0x2 number:0x4
			*/
			if(0x7fff == e.value && 0x4 == e.number)
			{
				joypad |= 1<<7;
			}
			//松开
			if(0x0 == e.value && 0x4 == e.number)
			{
				joypad &= ~(1<<6 | 1<<7);
			}
		}

		if(0x1 == e.type)
		{
			/*选择:
			value:0x1 type:0x1 number:0xa
			value:0x0 type:0x1 number:0xa
			*/
			if(0x1 == e.value && 0xa == e.number)
			{
				joypad |= 1<<2;
			}
			if(0x0 == e.value && 0xa == e.number)
			{
				joypad &= ~(1<<2);
			}

			/*开始:
			value:0x1 type:0x1 number:0xb
			value:0x0 type:0x1 number:0xb
			*/
			if(0x1 == e.value && 0xb == e.number)
			{
				joypad |= 1<<3;
			}
			if(0x0 == e.value && 0xb == e.number)
			{
				joypad &= ~(1<<3);
			}

			/*A
			value:0x1 type:0x1 number:0x0
			value:0x0 type:0x1 number:0x0
			*/
			if(0x1 == e.value && 0x0 == e.number)
			{
				joypad |= 1<<0;
			}
			if(0x0 == e.value && 0x0 == e.number)
			{
				joypad &= ~(1<<0);
			}

			/*B
			value:0x1 type:0x1 number:0x1
			value:0x0 type:0x1 number:0x1
			*/
			if(0x1 == e.value && 0x1 == e.number)
			{
				joypad |= 1<<1;
			}
			if(0x0 == e.value && 0x1 == e.number)
			{
				joypad &= ~(1<<1);
			}

			/*X
			value:0x1 type:0x1 number:0x3
			value:0x0 type:0x1 number:0x3
			*/
			if(0x1 == e.value && 0x3 == e.number)
			{
				joypad |= 1<<0;
			}
			if(0x0 == e.value && 0x3 == e.number)
			{
				joypad &= ~(1<<0);
			}

			/*Y
			value:0x1 type:0x1 number:0x4
			value:0x0 type:0x1 number:0x4
		 	*/
		 	if(0x1 == e.value && 0x4 == e.number)
			{
				joypad |= 1<<1;
			}
			if(0x0 == e.value && 0x4 == e.number)
			{
				joypad &= ~(1<<1);
			}
		}
		return joypad;
	}
	return -1;
}
调试了一下:
# ./InfoNES Tankwar.nes
/dev/input/js0 dev node ok!
fb width:800 height:480
type: 129, axis number: 0, value: 0, time: -214620
type: 129, axis number: 1, value: 0, time: -214620
type: 129, axis number: 2, value: 0, time: -214620
type: 129, axis number: 3, value: 0, time: -214620
type: 129, axis number: 4, value: 0, time: -214620
type: 129, axis number: 5, value: 0, time: -214620
type: 129, axis number: 6, value: 0, time: -214620
type: 129, axis number: 7, value: 0, time: -214620
type: 129, axis number: 8, value: 0, time: -214620
type: 129, axis number: 9, value: 0, time: -214620
type: 129, axis number: 10, value: 0, time: -214620
type: 129, axis number: 11, value: 0, time: -214620
type: 130, axis number: 0, value: 0, time: -214620
type: 130, axis number: 1, value: 0, time: -214620
type: 130, axis number: 2, value: 0, time: -214620
type: 130, axis number: 3, value: 0, time: -214620
按键是可以获得键值的!!
看了一下逻辑,是键值没有对上
改一下:/linux/joypad_input.cpp 文件的这个函数就可以适配我的游戏手柄了
static int USBjoypadGet(void)
{
	/**
	 * FC joypad bitmap 1Byte==8bits
	 * 0  1   2       3       4    5      6     7
	 * A  B   Select  Start  Up   Down   Left  Right
	 */
	//USB joypad every time can read 1 bit, so,need static var save last time value
	static unsigned char joypad = 0;
	struct js_event e;
	if(0 < read (USBjoypad_fd, &e, sizeof(e)))
	{
		//printf("type: %d, axis number: %d, value: %d, time: %d\n", e.type, e.number, e.value, e.time);
		if(0x2 == e.type) // axis
		{
			/*
			up:
			value:0x8001 type:0x2 number:0x1
			value:0x0 type:0x2 number:0x1
			*/
			if(0x8001 == e.value && 0x1 == e.number)
			{
				joypad |= 1<<4;
			}

			/*down
			value:0x7fff type:0x2 number:0x1
			value:0x0 type:0x2 number:0x1
			*/
			if(0x7fff == e.value && 0x1 == e.number)
			{
				joypad |= 1<<5;
			}
			//release
			if(0x0 == e.value && 0x1 == e.number)
			{
				joypad &= ~(1<<4 | 1<<5);
			}

			/*left
			value:0x8001 type:0x2 number:0x0
			value:0x0 type:0x2 number:0x0
			*/
			if(0x8001 == e.value && 0x0 == e.number)
			{
				joypad |= 1<<6;
			}

			/*right
			value:0x7fff type:0x2 number:0x0
			value:0x0 type:0x2 number:0x0
			*/
			if(0x7fff == e.value && 0x0 == e.number)
			{
				joypad |= 1<<7;
			}
			//release
			if(0x0 == e.value && 0x0 == e.number)
			{
				joypad &= ~(1<<6 | 1<<7);
			}
		}

		if(0x1 == e.type) // btn
		{
			/*select
			value:0x1 type:0x1 number:0x8
			value:0x0 type:0x1 number:0x8
			*/
			if(0x1 == e.value && 0x8 == e.number)
			{
				joypad |= 1<<2;
			}
			if(0x0 == e.value && 0x8 == e.number)
			{
				joypad &= ~(1<<2);
			}

			/*start
			value:0x1 type:0x1 number:0x9
			value:0x0 type:0x1 number:0x9
			*/
			if(0x1 == e.value && 0x9 == e.number)
			{
				joypad |= 1<<3;
			}
			if(0x0 == e.value && 0x9 == e.number)
			{
				joypad &= ~(1<<3);
			}

			/*A
			value:0x1 type:0x1 number:0x0
			value:0x0 type:0x1 number:0x0
			*/
			if(0x1 == e.value && 0x0 == e.number)
			{
				joypad |= 1<<0;
			}
			if(0x0 == e.value && 0x0 == e.number)
			{
				joypad &= ~(1<<0);
			}

			/*B
			value:0x1 type:0x1 number:0x1
			value:0x0 type:0x1 number:0x1
			*/
			if(0x1 == e.value && 0x1 == e.number)
			{
				joypad |= 1<<1;
			}
			if(0x0 == e.value && 0x1 == e.number)
			{
				joypad &= ~(1<<1);
			}

			/*X
			value:0x1 type:0x1 number:0x2
			value:0x0 type:0x1 number:0x2
			*/
			if(0x1 == e.value && 0x2 == e.number)
			{
				joypad |= 1<<0;
			}
			if(0x0 == e.value && 0x2 == e.number)
			{
				joypad &= ~(1<<0);
			}

			/*Y
			value:0x1 type:0x1 number:0x3
			value:0x0 type:0x1 number:0x3
		 	*/
		 	if(0x1 == e.value && 0x3 == e.number)
			{
				joypad |= 1<<1;
			}
			if(0x0 == e.value && 0x3 == e.number)
			{
				joypad &= ~(1<<1);
			}
		}
		//printf("joypad-value: 0x%02x\n", joypad);
		return joypad;
	}
	return -1;
}
Nice,手柄可以了!完成!
7、添加键盘支持
InfoNes 默认只支持具有专有驱动的游戏手柄和一种 USB 通用手柄,但是我们手头只有键盘,所以我们需要添加键盘相关的驱动代码。事实上你下载的代码已经添加了键盘功能,如果想要看看修改了啥,可以看下面。
这里需要修改 linux/joypad_input.cpp 文件,该文件就是用来配置执行游戏操作相关的代码。
添加引用、宏定义、以及全局变量(注意插入的键盘是 event 多少,修改 /dev/input/event0 )
#include <linux/input.h> //此处需要用到 input_event结构
#define KEYBOARD_DEV "/dev/input/event0" //键盘所在的文件、请根据实际情况进行调整
……
static int joypad_fd;
static int USBjoypad_fd;
static int keyboard_fd;  //新增加的用于存储键盘的句柄
static PT_JoypadInput g_ptJoypadInputHead;
……
接下来是添加键盘结构体,以及相关初始化、释放、获取值相关的代码。
这里我们重点看一下 KeyBoardGet() ,在 nes 游戏中我们只需要配置 8 个键就可以了,对应如下表所示:

代码如下:
//****************************keyBoard****************************************

static int KeyBoardGet(void)
{
    /**
     * FC手柄 bit 键位对应关系 真实手柄中有一个定时器,处理 连A  连B
     * 0  1   2       3       4    5      6     7
     * A  B   Select  Start  Up   Down   Left  Right
     *
     * o  p   <space> <Enter> w   s      a      d
     * 24 25  57      28      17  31    30     32
     *
     * 来自 /usr/include/linux/input-event-codes.h
     */
    //因为 USB 手柄每次只能读到一位键值 所以要有静态变量保存上一次的值
    static unsigned char joypad = 0;
    struct input_event e; //这里使用标准的input_event结构体
    int result = -1;
    result = read(keyboard_fd, &e, sizeof(struct input_event));
    if (result != sizeof(struct input_event))
    {
        printf("key error %d \n", result);
        return -1;
    }

    //printf("value:%u   type:%u  code:%u ", e.value, e.type, e.code);

    if (0x01 == e.type) //EV_KEY            0x01
    {
        /*上 W */
        if (1 == e.value && 17 == e.code)
        {
            joypad |= 1 << 4;
        }
        if (0 == e.value && 17 == e.code)
        {
            joypad &= ~(1 << 4);
        }

        /*下 S*/
        if (1 == e.value && 31 == e.code)
        {
            joypad |= 1 << 5;
        }
        if (0 == e.value && 31 == e.code)
        {
            joypad &= ~(1 << 5);
        }

        /*左 A*/
        if (1 == e.value && 30 == e.code)
        {
            joypad |= 1 << 6;
        }
        if (0 == e.value && 30 == e.code)
        {
            joypad &= ~(1 << 6);
        }

        /*右 D*/
        if (1 == e.value && 32 == e.code)
        {
            joypad |= 1 << 7;
        }
        if (0 == e.value && 32 == e.code)
        {
            joypad &= ~(1 << 7);
        }

        /*选择 space*/
        if (1 == e.value && 57 == e.code)
        {
            joypad |= 1 << 2;
        }
        if (0 == e.value && 57 == e.code)
        {
            joypad &= ~(1 << 2);
        }

        /*开始 enter*/
        if (1 == e.value && 28 == e.code)
        {
            joypad |= 1 << 3;
        }
        if (0 == e.value && 28 == e.code)
        {
            joypad &= ~(1 << 3);
        }

        /*A O*/
        if (1 == e.value && 24 == e.code)
        {
            joypad |= 1 << 0;
        }
        if (0 == e.value && 24 == e.code)
        {
            joypad &= ~(1 << 0);
        }

        /*B P*/
        if (1 == e.value && 25 == e.code)
        {
            joypad |= 1 << 1;
        }
        if (0 == e.value && 25 == e.code)
        {
            joypad &= ~(1 << 1);
        }
    }
    return joypad;
}

static int KeyBoardDevInit(void)
{
    keyboard_fd = open(KEYBOARD_DEV, O_RDONLY);
    if (-1 == keyboard_fd)
    {
        printf("%s dev not found \r\n", KEYBOARD_DEV);
        return -1;
    }
    return 0;
}

static int KeyBoardDevExit(void)
{
    close(keyboard_fd);
    return 0;
}

static T_JoypadInput KeyBoardInput = {
    KeyBoardDevInit,
    KeyBoardDevExit,
    KeyBoardGet,
};

//********************************************************************
最后我们来注册一下键盘,修改 int InitJoypadInput(void) 函数
int InitJoypadInput(void)
{
    int iErr = 0;
    //iErr = RegisterJoypadInput(&joypadInput);
    //iErr = RegisterJoypadInput(&usbJoypadInput);
    iErr = RegisterJoypadInput(&KeyBoardInput);  //这里我们只注册键盘
    return iErr;
}
修改完成后重新编译就可以用键盘来控制游戏了
8、参考
iMX6ULL应用移植 | 移植 infoNES 模拟器(重玩经典NES游戏)
https://whycan.com/t_5139.html#p52283
评论区